Welcome back, dear readers, to the season finale of “Marti Makes a Mudroom Less Gross.” Before we get to the before and after photos, there are three more projects I need to cover for you: the flooring, the sliding door railing, and some shade trickery. This post is long, so settle in! You’ll be rewarded with a cat GIF at the end.
Floor + Rug
Back in June 2017, I scrubbed the plywood floor and then stained and sealed it with Ready Seal.

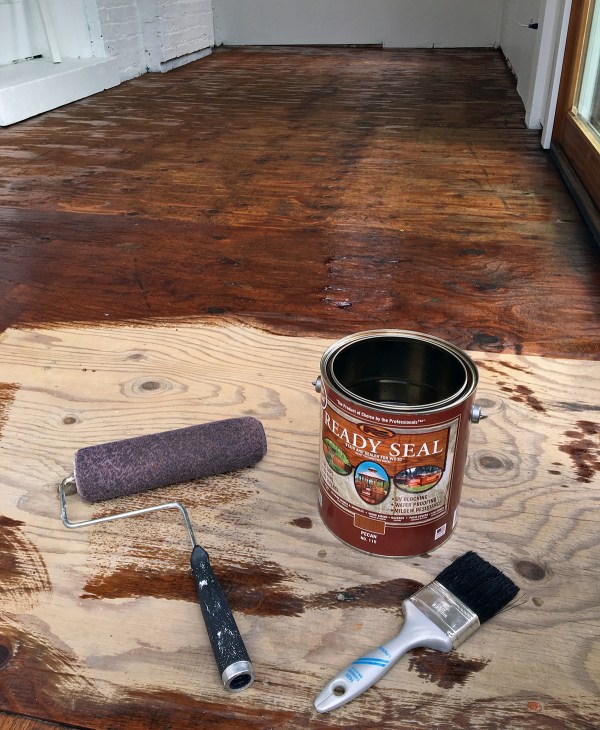
The floor definitely looked better, but I still wanted a rug in here. I bought the indoor/outdoor Hodde rug from IKEA shortly thereafter – it covered half of the room. While working on this One Room Challenge, I decided that I wanted something to cover the full length of the room (it’s roughly 6.5′ x 16′). A custom-made indoor/outdoor rug would have run me $700+, and Flor tiles came in around the same price. Painting or stenciling the floor wasn’t a solution because I wanted a rug to help stop dirt and cat litter from being tracked into the house.
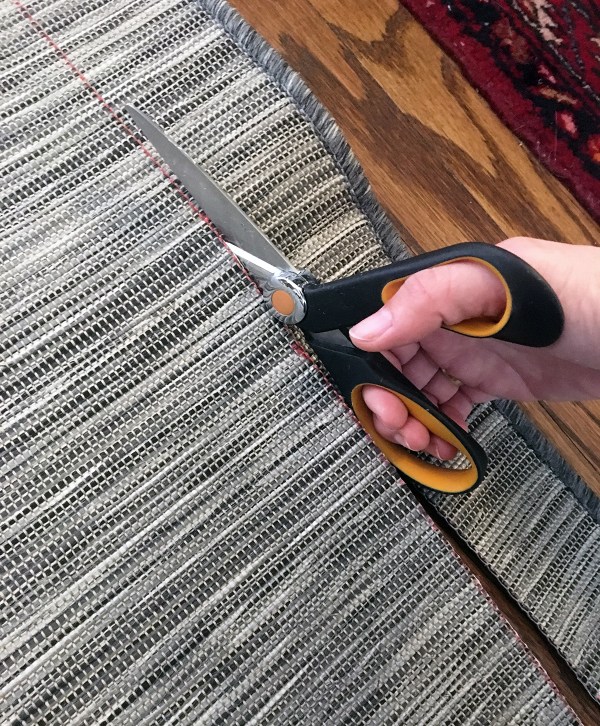
I knew from having the Hodde for over a year that it’s super durable and hides stains well. Long story short: buying a second rug seemed like the best way to proceed. The only catch was that the back half of the room is a few inches more narrow because of the brick bump out. I had to trim the rug to fit.
I found this Instabind DIY Rug Binding on Amazon and decided to give it a shot. I carefully marked off the rug and cut it with my sharpest scissors. (I cut right on the line – in retrospect, I should have cut immediately inside the line because you can see some red on my newly-bound edge, BUT it doesn’t matter since you barely see this side of the rug. That will make sense once you see the after photos.)
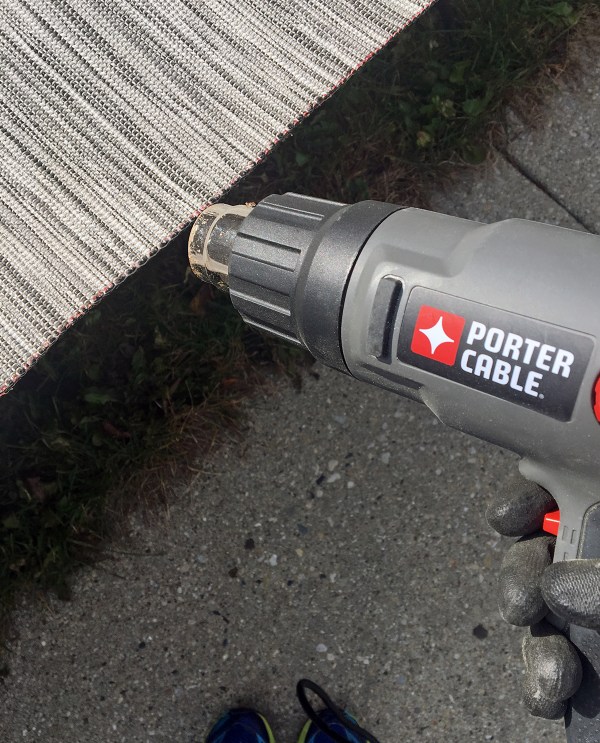
Then I singed the cut edge with my heat gun. Because the rug is polypropylene (AKA plastic), the threads melted cleanly.
TBH, this was probably sufficient to keep the rug from fraying, but I decided to add the rug binding for good measure since I had already purchased it.
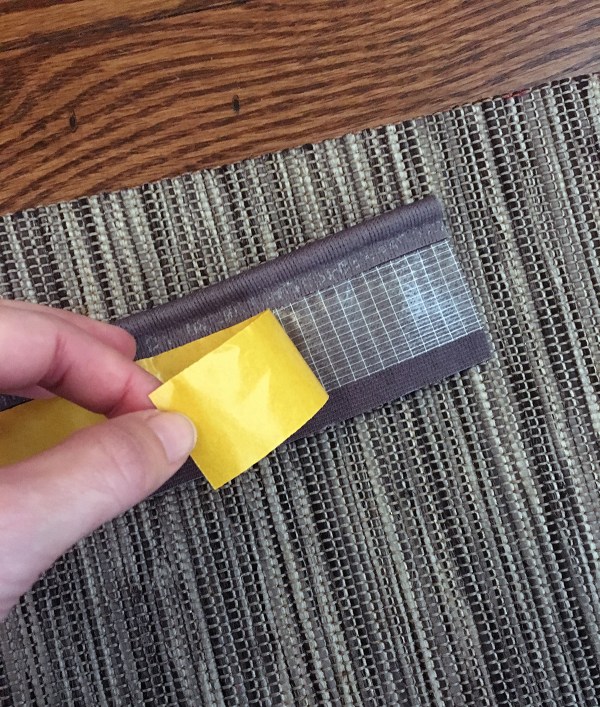
The rug binding has an adhesive strip that holds the binding to the back side of the rug, which you reinforce with a line of hot glue.

That’ll do!
Sliding Door Railing
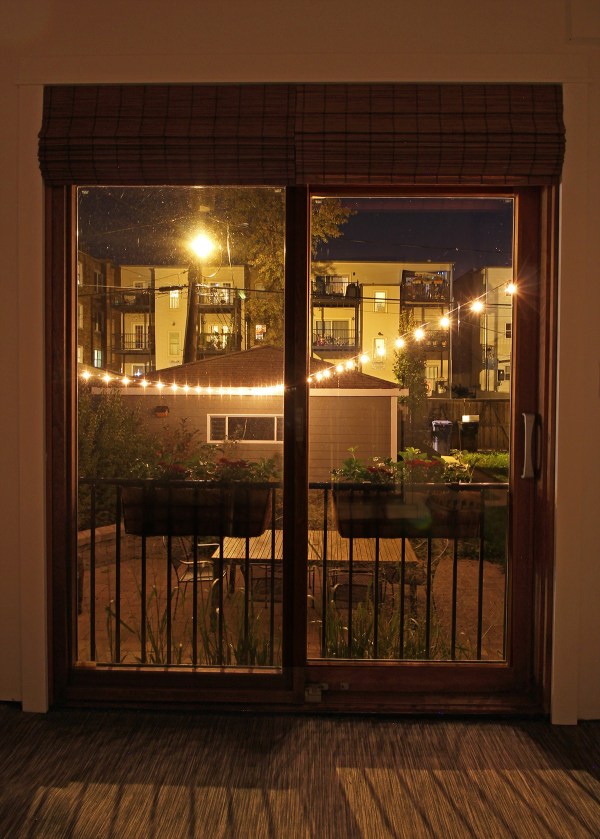
This is what the back of the mudroom looked like the last time you saw it on this blog. In my Backyard Patio, Painting, and Landscaping post, I said “in 2017, I’m going to put up a railing” – well, I didn’t get around to that until May 2018. I didn’t blog about it then, so I wanted to share it quickly now since it made a big difference to the interior of the room.
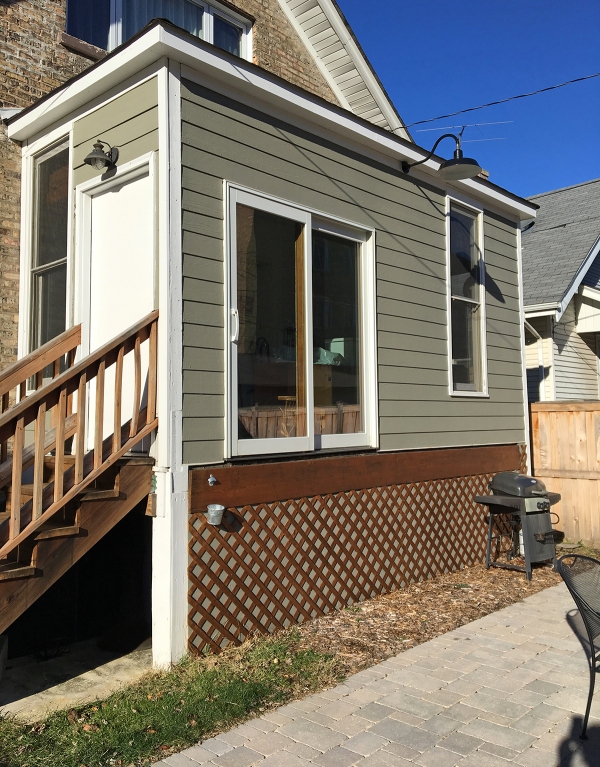
I made a pair of simple wood posts to mount on either side of the door, giving me something to hang the railing on. Using my miter saw, I bevel cut the top and bottom of the wood so it looks more finished.

I bought the black metal railing at my Home Depot store – I can’t find it on their website to link to, but it was $60ish. The planters came from Home Depot, too.

The railing is crucial because we now have a sliding screen door in the mudroom. A while back, I found a few jumbled Pella screen doors at Lowe’s. The boxes were beat up and the store employee said they were “last year’s model.” I asked if he’d sell one for a discount and I got it for 40% off! I’ve never bargained at a big box store before and it felt like an achievement unlocked.
Anyway, all that to say: when it’s nice weather, we open the kitchen door and the sliding door, and we get a wonderful cross-breeze from the back to our front windows. The railing would stop anyone (Jarrod) from tumbling out.
That marble door stop is from CB2.
Much better than where we started:
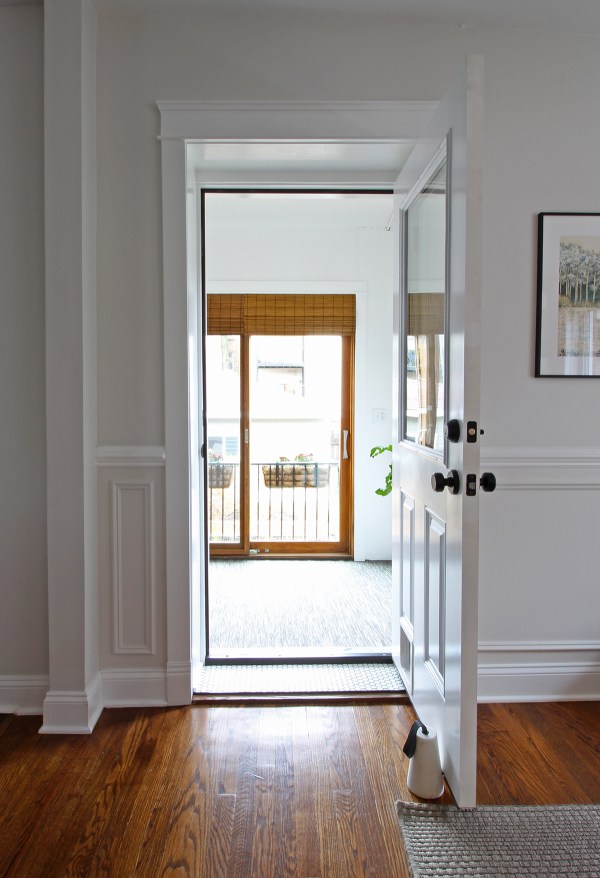
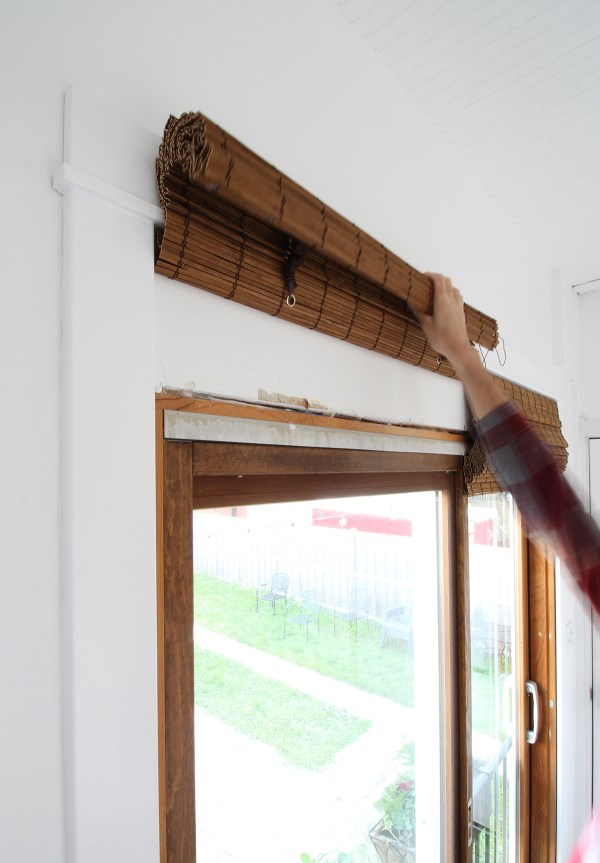
Window Shade Trickery
Speaking of the sliding door: I wanted shades to make it look nicer, but I didn’t want to block any of the light that comes through our new half-lite kitchen door (see Kitchen Progress: New Door, Trim, and Threshold Tile).
So, I cheated! I installed the moulding a foot above the top of the door.
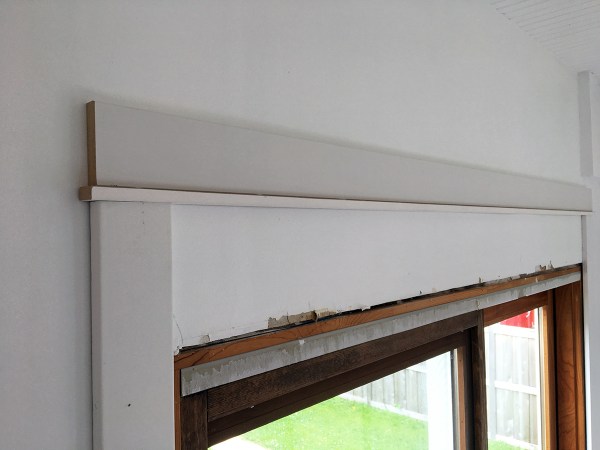
This trick makes the door look taller, which is a better balance for our oddly tall windows, and it allowed me to hang shades without blocking any natural light.

Before and After
Now you’re all caught up! Let’s do this.
Before: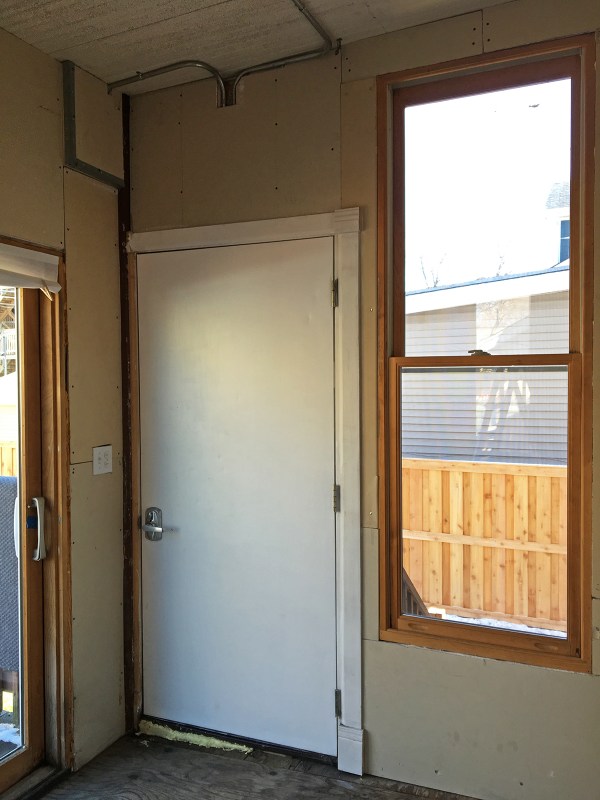
After:
Before:
After: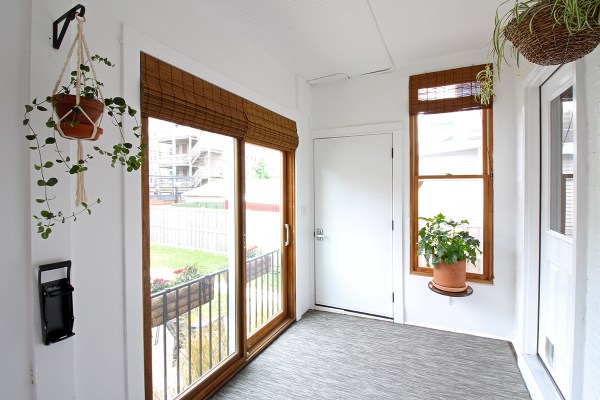
Before: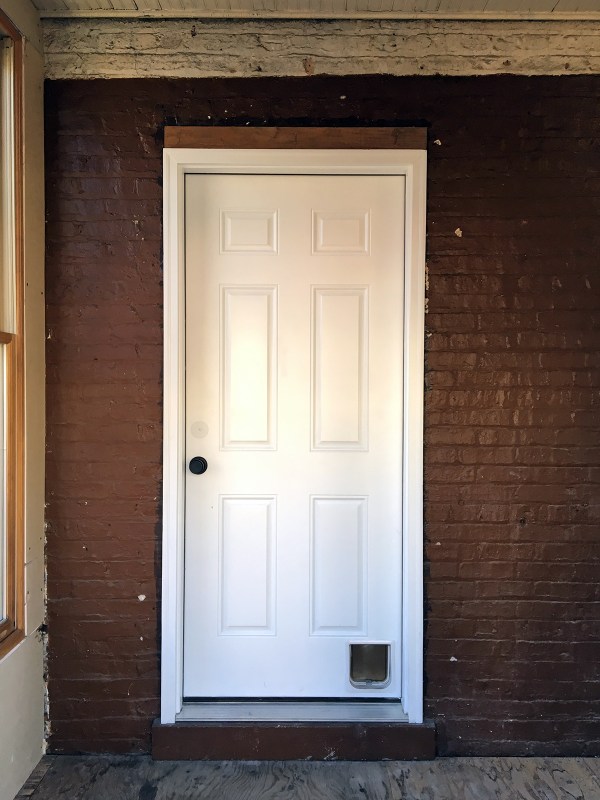
After:
Before: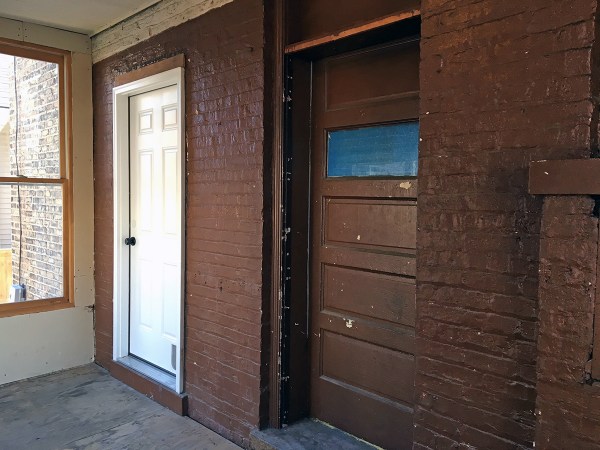
After: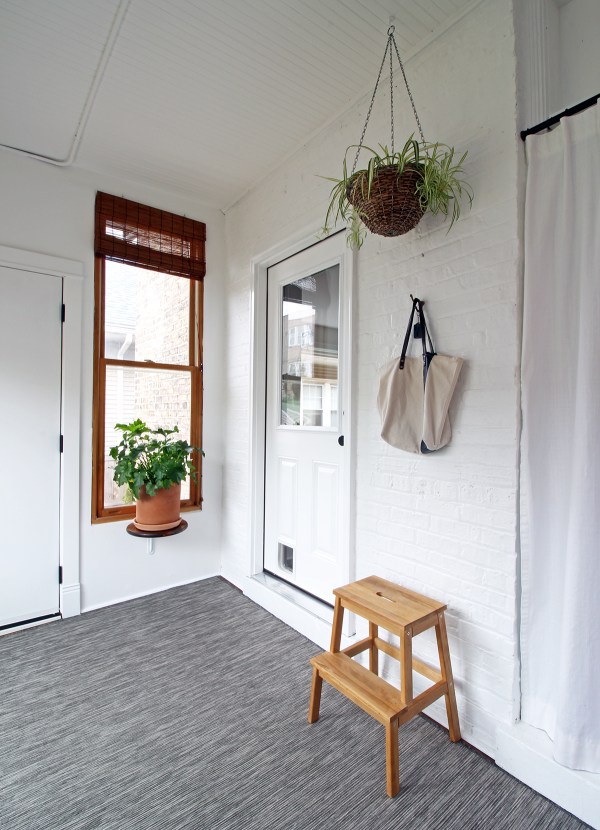
The vintage brass hook holds my errand running tote and this $11 remote control I connected to our patio string lights.
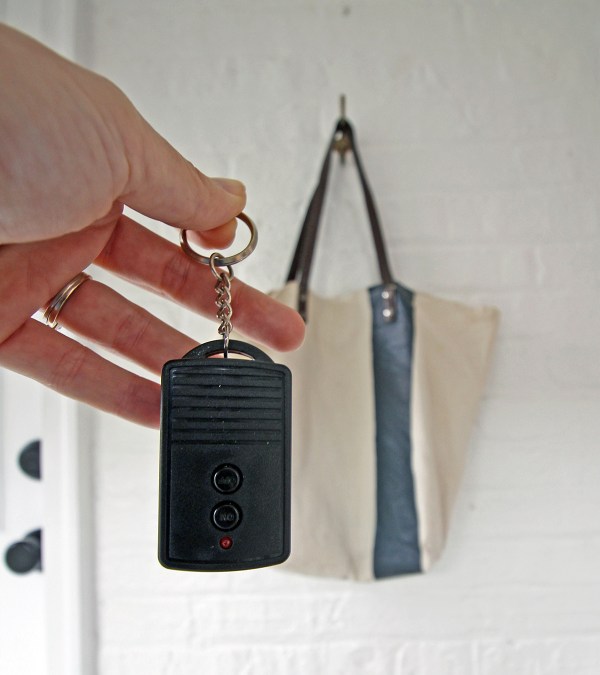
The outlet for the lights is outside under the mudroom. I like to have them on in the evenings sometimes – just because they’re pretty to see from our kitchen – and this remote lets me turn them on and off easily.
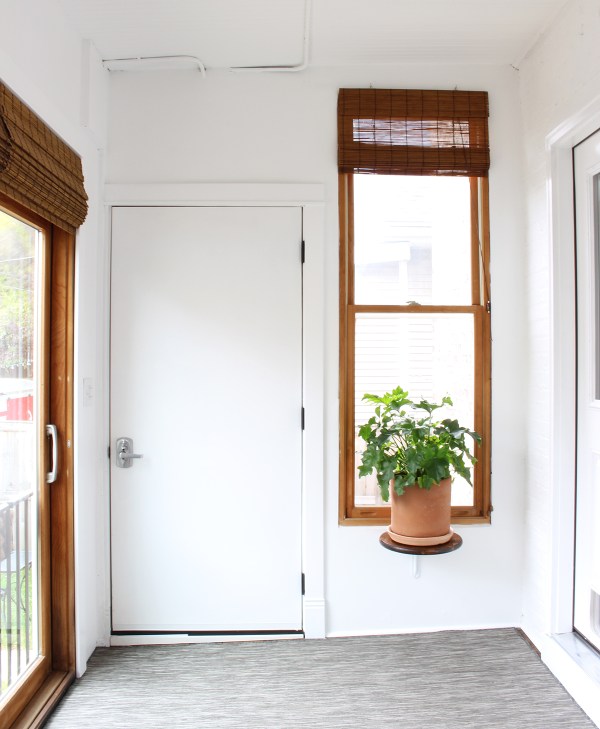
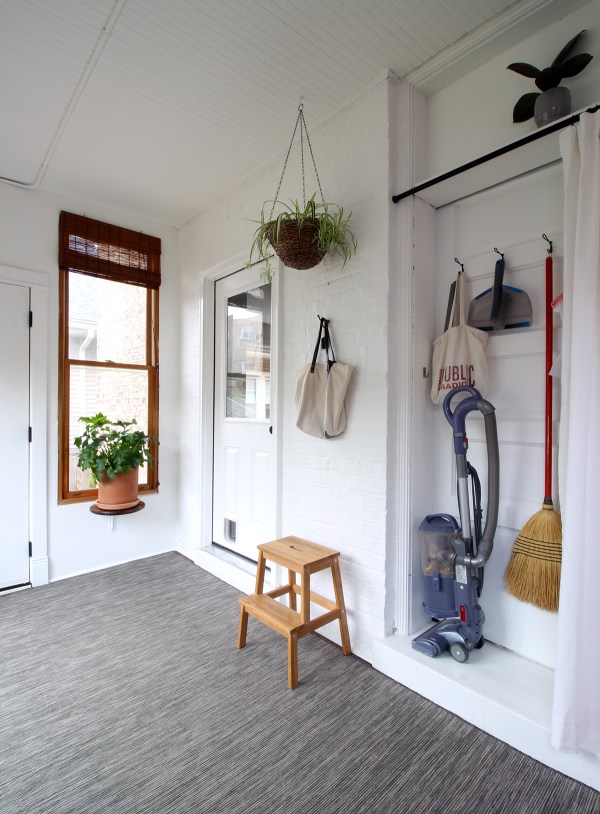
Back to daylight! This is what the broom nook looks like with the curtain pulled back.
Before: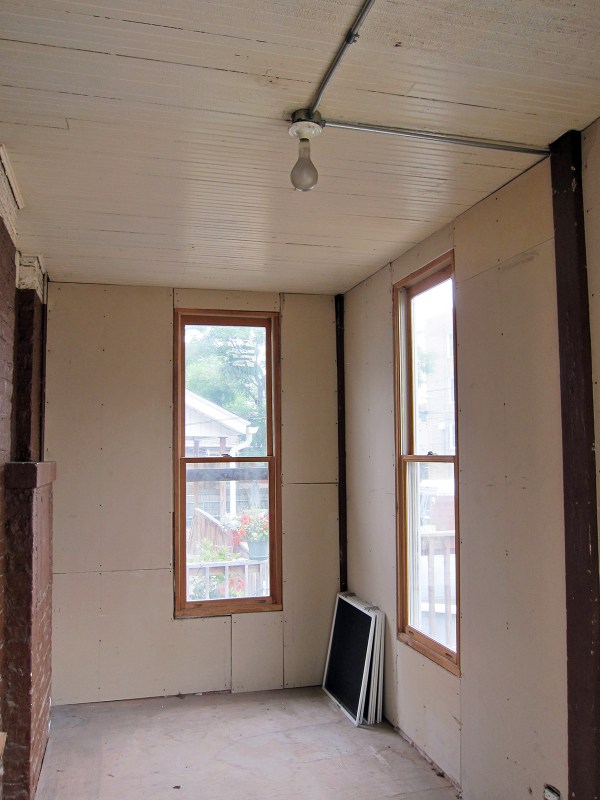
After: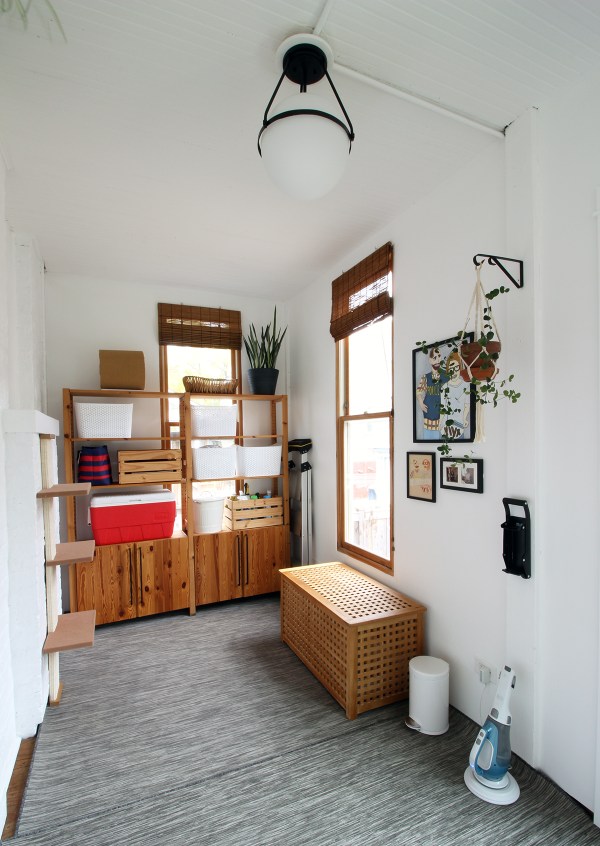
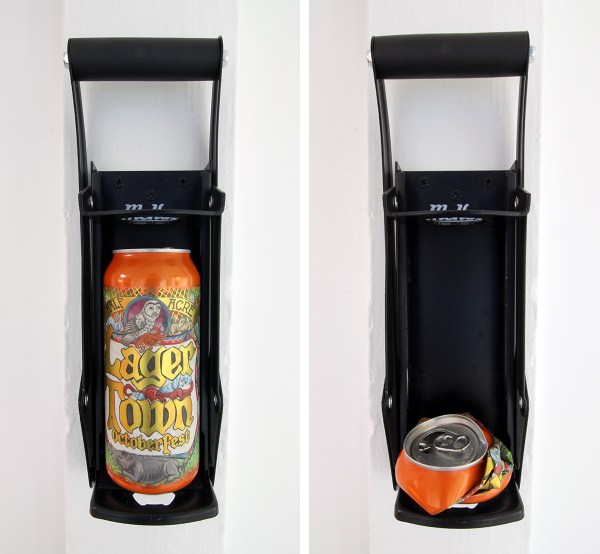
In the foreground you see our dust buster, a trashcan for scooped cat litter, and a can crusher. Chicago has a single-bin recycling program (cardboard, paper, metal, glass, etc. goes into one barrel) and there’s pretty low odds that what you put in there actually gets recycled. But there are people who dig through recycling bins looking for cans: I figure if there are people doing that hard work, and someone is paying for them, those cans are definitely getting recycled. I installed this can crusher last week, and there’s a plastic bag hanging inside the broom closet. My plan is to collect cans and then put out the bag for someone to easily pick up.
Next to the can crusher we have some hilariously terrible/beautiful art: a painting our friends Jean and Tyler gave us as a thank you for officiating their wedding; a drawing Jarrod made of the painting; and the original, unrelated photos that inspired the painting. (Jarrod is most definitely not a cop: that’s our cousin-in-law’s police vest.)
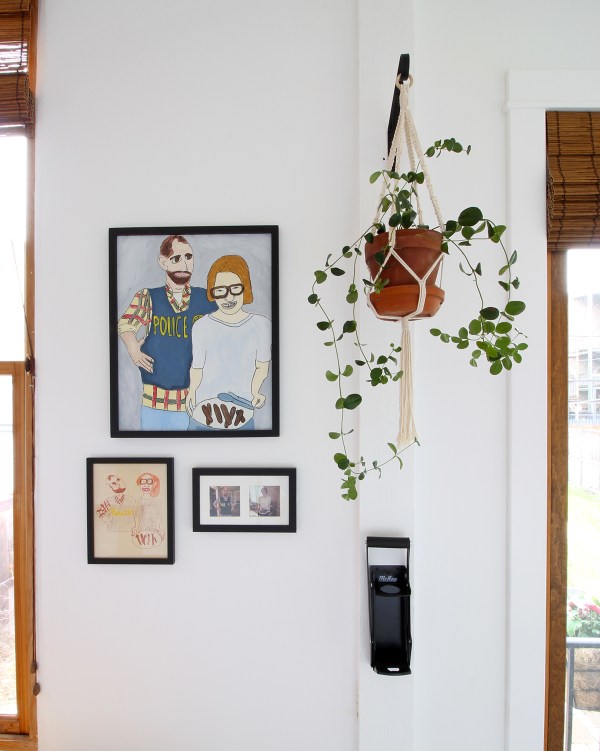
Tyler really captured our essence.

Before: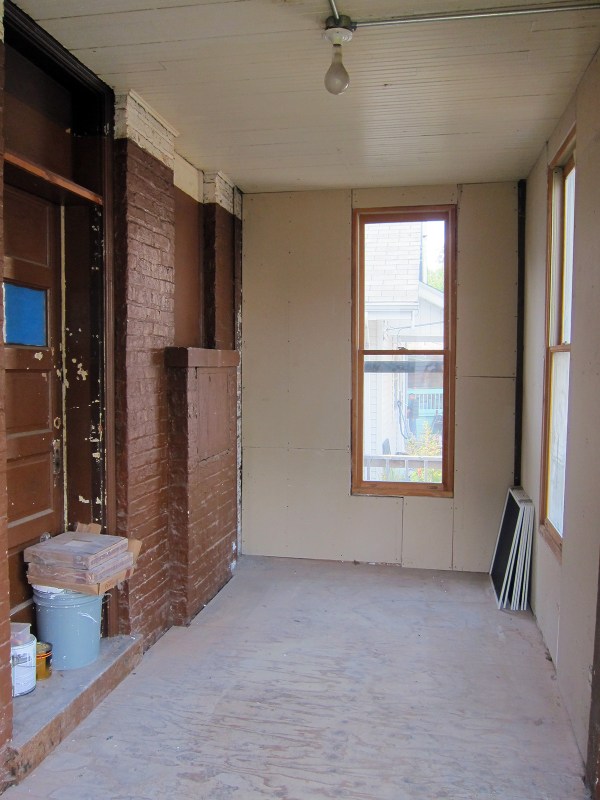
After: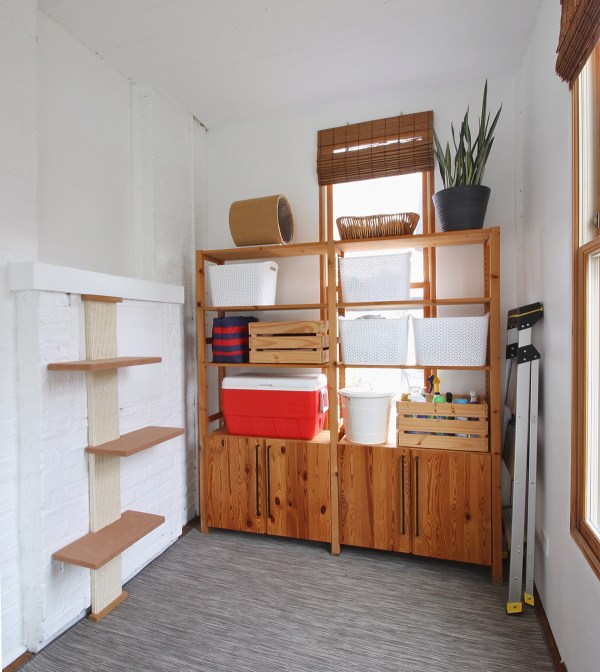
The Ivar shelving unit holds a lot – including our cooler, a bin of reusable shopping bags, a pail of fresh litter, cleaning supplies, etc. – but there’s still room to spare, which is always nice! The Knagglig wood crates are from IKEA and the woven plastic baskets are from Target. I use the step ladder a lot, so it’s handy to have easily accessible.
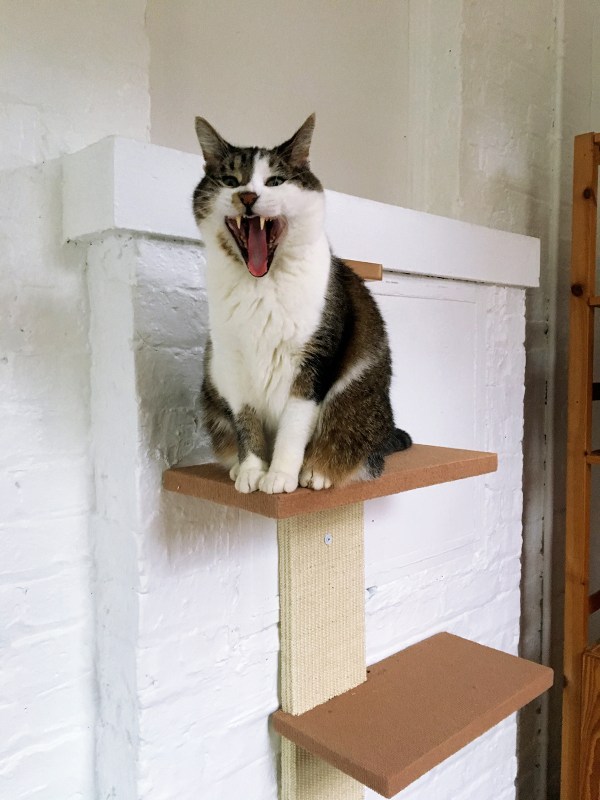
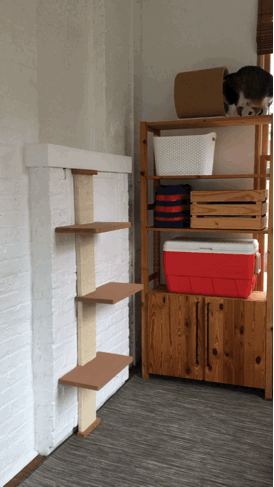
I actually used to leave this ladder out for Lola to climb up to the top of the shelving unit, but now he has a cat climber. He’s jazzed about it.
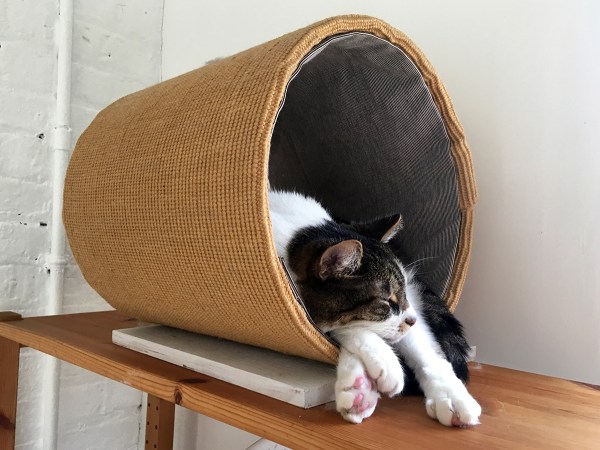
He likes to hang out on top of the shelving unit, in this tunnel I made years ago or in the basket next to it.
Ooof, this post got long! Sorry about that. Here’s the GIF I promised:
The End
Early in this project, I accidentally typed “murdoom” instead of “mudroom” and that’s how I’ve been thinking of this space: it felt murdery and doomed. Now it’s a practical, functional room that feels like a natural extension of our house. Thanks for following along!
Previous ORC posts:
- One Room Challenge Week 1: Mudroom Makeover
- ORC Week 2: Drywall Finishing and So Much Painting
- ORC Week 3: Doorway Broom Closet
- ORC Week 4: Door Trim, Window Shade, and Plant Shelf
- ORC Week 5: Shelving, Litter Box, and Light Fixture
You can check out all the other guest participants on the ORC website.


I love what you’ve done with your murdroom 😂. It looks great… very functional and easy on the eyes. I think my new favorite addition is that rail. I would have never thought to do that. The window boxes (and the newly planted ornamental grass) are the perfect finishing touches to that area. Awesome job! I can’t wait to see your next project(s).
Amazing transformation! Love the attention to cathood. One note-not sure if it’s different in Chicago, but to cash in can deposits in Iowa and NYC, you need to have the barcode read by a machine, so crushing the cans may actually stop folks from being able to do so.
Same here in MA! I just leave our cans and bottles in a separate bag or box near our bin on recycling day…
Thank you! That’s a good callout for other states, but we don’t have a can deposit. I see the people who collect cans crush them in the alley, so I know the barcode won’t be an issue here.
Yay! I love it! I would love to have this type of functional space for all the necessary things that aren’t that pretty (cat litter! vacuum cleaner!) . You took a murder room and made it cozy!
I still can’t get over the Before and how much creativity and vision you had/have. I think I loved every detail and how you made such a functional , good looking space on a budget. And I love the cat tunnel!
Great transformation!!
So smart about that rug. And love that light, I used it in our master bedroom ORC!
It looks so good, Marti! You are a wizard with organization. This is the perfect functional makeover with pretty details to boot. I love the rug binding solution, and I am filing that trick away for later. Lola looks very content except in that photo where it looks like he might want to kill me. :)
Murdoom! That’s hilarious. You’ve definitely done marvels with a most unusual space. And your post made me laugh out loud.