In my greatest DIY victory to date, I installed an IKEA HEMNES bathroom cabinet, DALSKAR faucet, and ODENSVIK sink (which came with RINNEN plumbing). Note that the title of this blog post is not “How to install an IKEA vanity” but rather “How I installed an IKEA vanity.” This is what worked for me.
I did a ton of Googling throughout this process and found some helpful guides (such as this one) that gave me the confidence to take on this project, but I didn’t find any blog posts that were identical to my situation. IKEA altered their standard plumbing kit significantly recently, so a lot of the information I found was outdated. Also, every home is going to have its own oddities.
This post won’t be of much interest to anyone who isn’t installing an IKEA sink, but I hope it’s helpful for at least one person who is! Specifically, here are the three issues I encountered that you might run into as well:
- Waste pipe that is 1-1/4″ vs IKEA plumbing that is 1-1/2″
- Faucet supply lines that are 3/8″ vs IKEA faucet lines that are 9/16″
- IKEA overflow hose that does not reach the drain
Before buying our house, I had never done any plumbing work. It was daunting because water can be so quickly and so thoroughly ruinous should anything go wrong. I installed our basement sink as a test case, and then tackled this on my own without disaster. If you’re handy and enjoy finding solutions to problems, I think IKEA plumbing is definitely a doable DIY.
Getting started
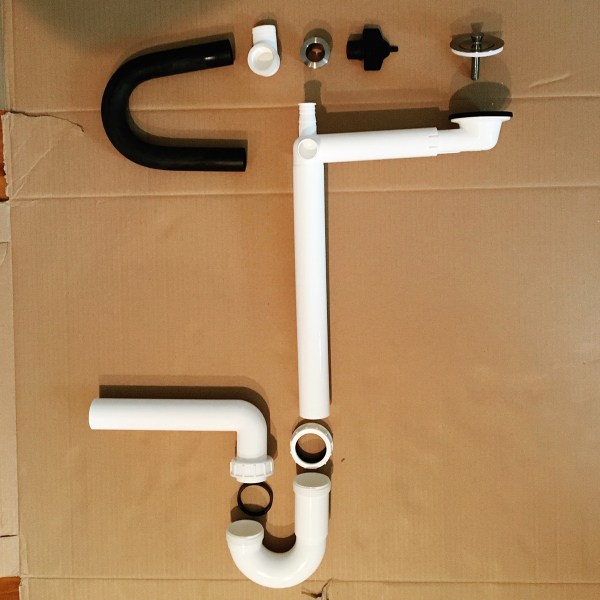
I started by laying out all of the parts in order. Note: if you buy an IKEA sink and an IKEA faucet, you’ll have a couple of duplicate parts.
I warned Jarrod that it may be several days until we had a working sink again. I hoped it would go smoothly, but I was prepared for some hiccups. We have a sink in our first floor half-bathroom, which helped make this a lot less stressful.
I turned off the inline shut-off valves, disconnected the existing sink, and stuck a rag in the wall drain hole to keep the stink contained.

I assembled the vanity cabinet and Jarrod helped me position it (it was nice to have an extra set of hands here, but not necessary — this can be a one-woman project). I adjusted the screw-in feet until it was level. Our floor slopes, so the right self-adjusting foot is extended quite a bit more than the left.

Once it was precisely placed and leveled, I marked off the four spots I’d need to drill and then moved the vanity out of the bathroom.
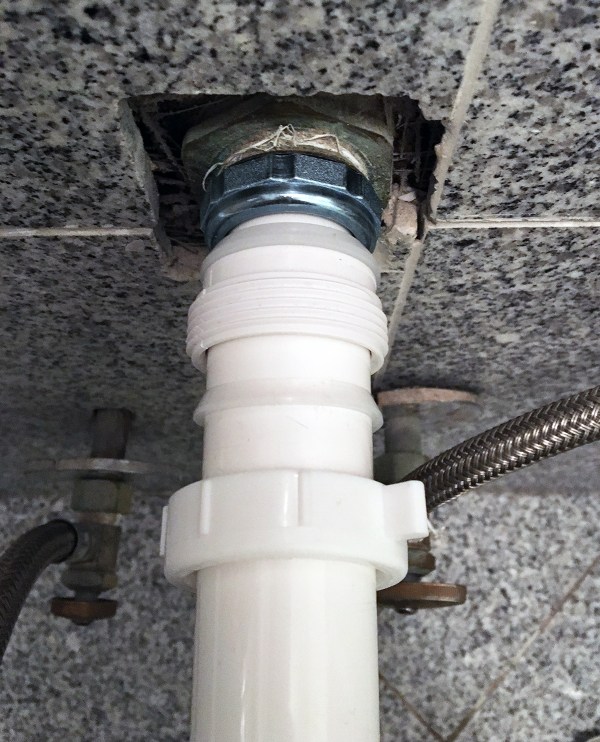
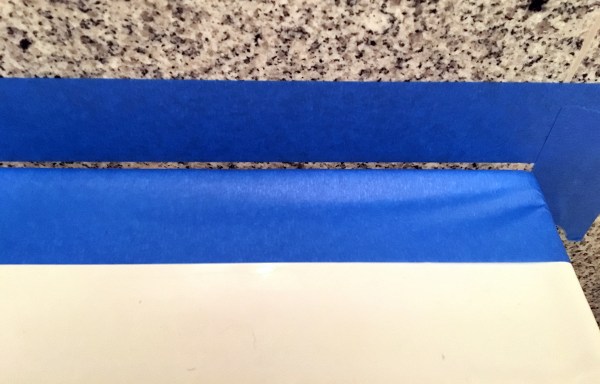
Drilling into granite tile
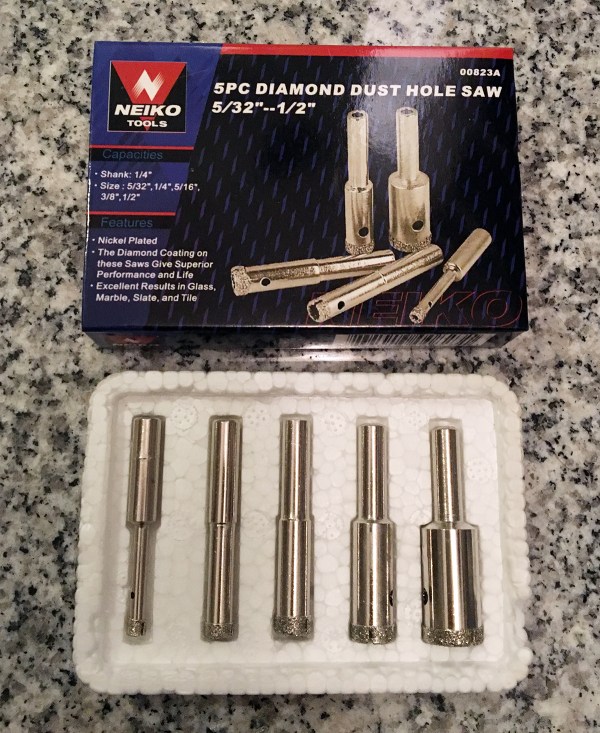
If you don’t have granite wall tiles, mounting the vanity will be pretty easy. If you do have granite tiles, like we do, I’m sorry. Drilling into granite is totally doable, but it’s time-consuming and expensive! The bits are made of diamonds and run $20+ each at Home Depot. It sounds like even the nice ones wear down quickly, requiring multiple bits to do the job. Having learned that, I chose to buy two cheap sets from Amazon. $22 total for 10 bits, and I wound up using every single one.
I sprayed the area with water continuously while drilling (sorry, no pics). After the holes were drilled, I put the vanity back in place.
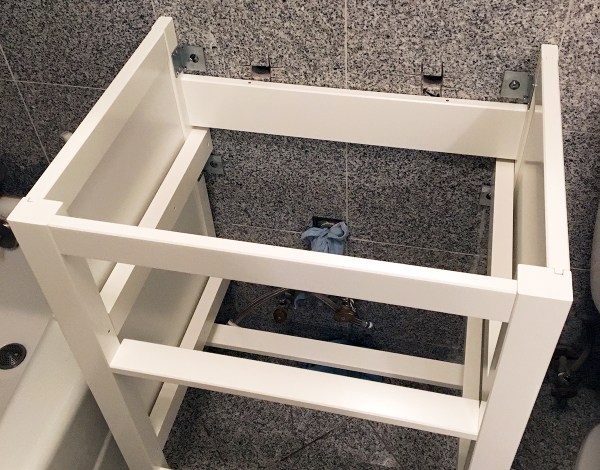
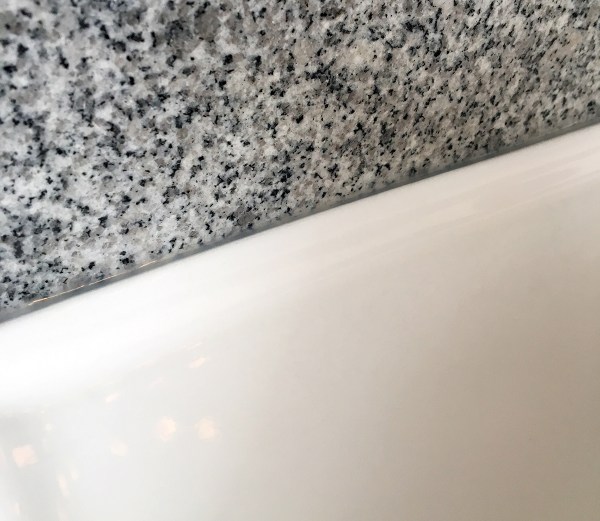
The big square holes are from the previous sink’s installation. The IKEA vanity is secured with metal clips (provided by IKEA) and toggle bolts (purchased by me).
Mounting the faucet on the sink
I installed the DALSKAR faucet on the ODENSVIK sink before placing it on the vanity – it was a lot easier to see and reach the underside this way.

The bottom of the metal faucet marked up the sink a bit as I was positioning it, which was disappointing. To avoid this, I’d recommend putting some painters tape around the hole and then removing it right before you tighten down the faucet. Otherwise, this step was straightforward and easy.
Figuring out the waste pipe connection
The waste pipe is the hole in the wall that the sink connects to, which I assume leads directly to the Chicago River. The IKEA p-trap drainpipe is 1-1/2 inches. Our waste pipe is smaller: 1-1/4 inches. So, I had to find a trap adapter/reducer. In retrospect, this wasn’t that big a deal: most of the battle was learning terminology and figuring out WTF I was even looking for.
Semi-Pro Tip #1: Don’t throw away anything you remove from your previous sink’s installation until you’ve successfully installed your new sink. Put it in a plastic bag and carry that grossness to every hardware store. If you’re a novice like I am, it’s extremely helpful to have with you to compare parts and to talk to store employees.

Semi-Pro Tip #2: When you’re in the hardware store, BUY EVERYTHING. Seriously, if you find yourself looking at something and thinking “This might work” or “I think this would fit” — BUY IT. Keep the receipt and return what you don’t use.
In the interest of helping anyone in the same boat, here are all the options I gathered within 36 hours via Amazon, Clark & Barlow Hardware, Home Depot, and Ace:
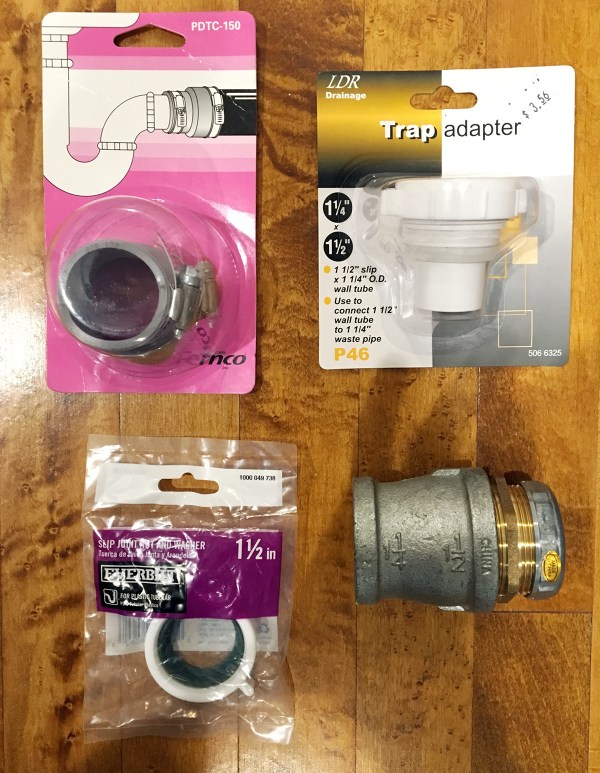
- Fernco Inc. PDTC-150 1-1/2-Inch Drain and Trap Connector
- LDR 506 6325 P46 Trap Adapter
- Galvanized Reducer 511-376BG (similar to this one)
- Everbilt Slip Joint Nut and Washer
The Everbilt washer the Home Depot guy sent me home with was totally wrong for the job, so that one was immediately ruled out. Any of the other three probably would have worked if space were not a crucial issue for IKEA plumbing (more on that later).

I experimented with both the galvanized reducer and the PVC trap adapter, ultimately choosing the PVC option because it was the most space-efficient.
Good god, this post is boring. I’m sorry. Let’s trudge on.
Connecting the faucet
Our supply valves are 3/8 inch. The IKEA manual states that the faucet lines are 9/16 inch. As far as I learned, this is not a measurement used by US plumbing standards.
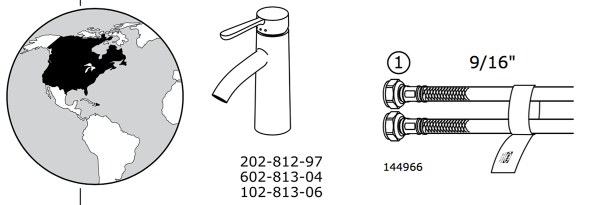
So, I was worried about connecting my existing 3/8″ lines to the IKEA faucet lines, but did not encounter any problems at all. The ends connected perfectly, and they are watertight. Whew! I don’t know if the manual is simply incorrect, or if the difference is so slight that it’s negligible. Just another IKEA oddity.
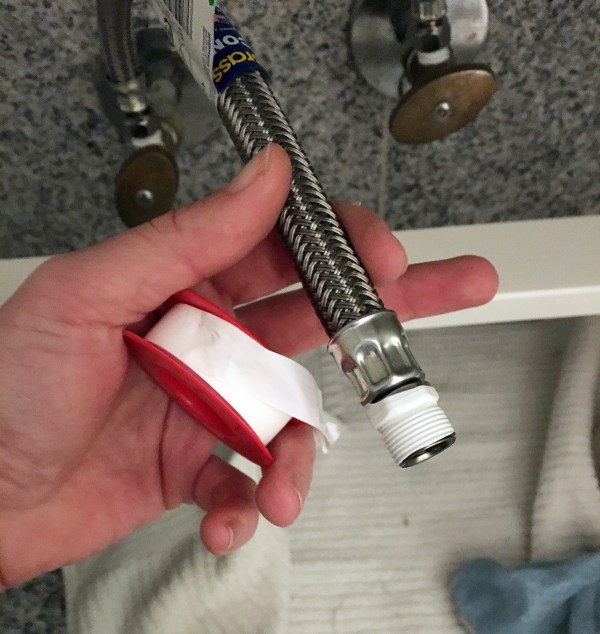
I wrapped the ends with Teflon tape to help ensure a tight seal.
Connecting the overflow drain and p-trap
This was the most frustrating part of the installation. Unlike the waste pipe, which was a challenge because of our house’s non-standard plumbing, this step was infuriating because it was caused by IKEA’s unforgiving design.
In order for the HEMNES drawers to slide in fully, the drain pipe and p-trap needs to be as close to the back wall as possible. The cabinet assembly does not allow a generous margin of error. Many people wind up having to shorten their drawers or hack notches into them. The drawers were the major appeal of this vanity in the first place, so I was hoping to avoid that.
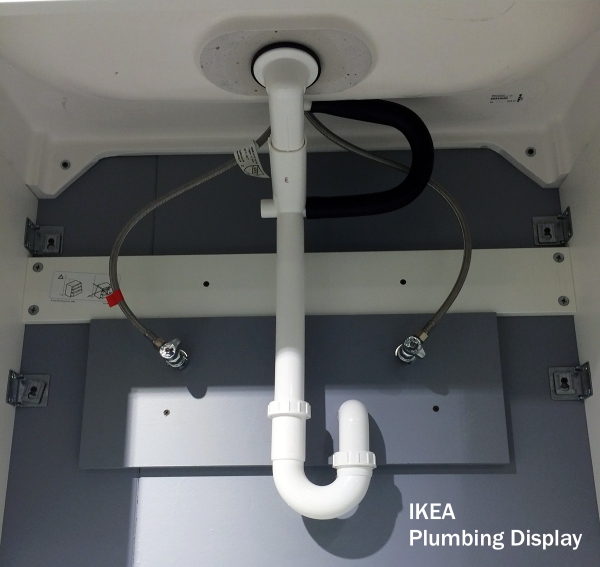
In the store display, IKEA shows the wall drain being off-center from the sink drain itself, so that the p-trap (the curved part at the bottom) is flush with the wall and the overflow tube (the black rubber piece) can be connected.

In my experience, this a totally unrealistic and unholy arrangement. Our wall drain hole is centered with the sink’s drain, like God intended. I had no choice but to position the drain to run at an angle, in order to get the p-trap flush with the wall.
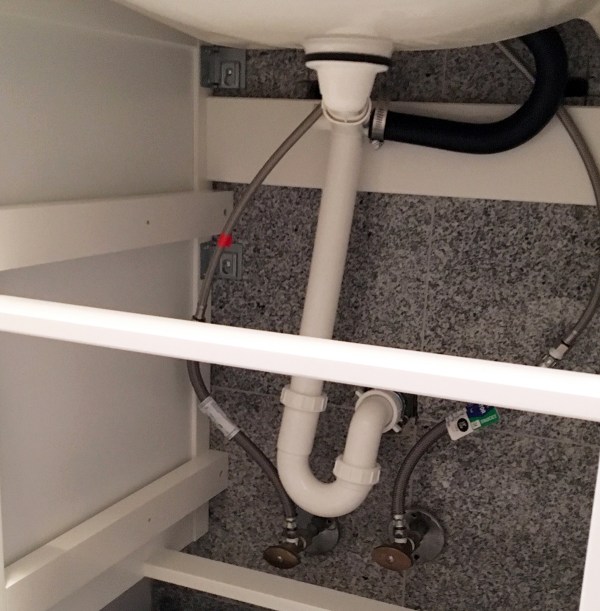
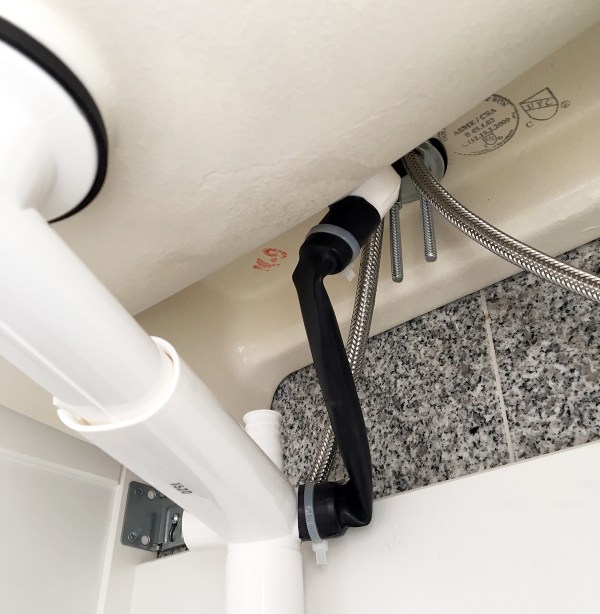
The overflow tube IKEA provides is quite rigid and would simply not bend or stretch to work with that arrangement. I could force it into place with a terribly angled drain (as you see above), but it would slowly disconnect because of the strain. IKEA’s design doesn’t include anything to actually secure it to the drain. I tried cable ties and steel screw clamps, but the black rubber was simply too rigid. Incredibly frustrating!
I went to Lowe’s, Home Depot, and Ace in search of tubing that could work as a replacement. I bought a few different types of plastic tubing, but in the end, nothing worked as well as a $3 bike inner tube I stole from Jarrod. It was flexible enough for the tight space, and I was able to secure it in place with cable ties.
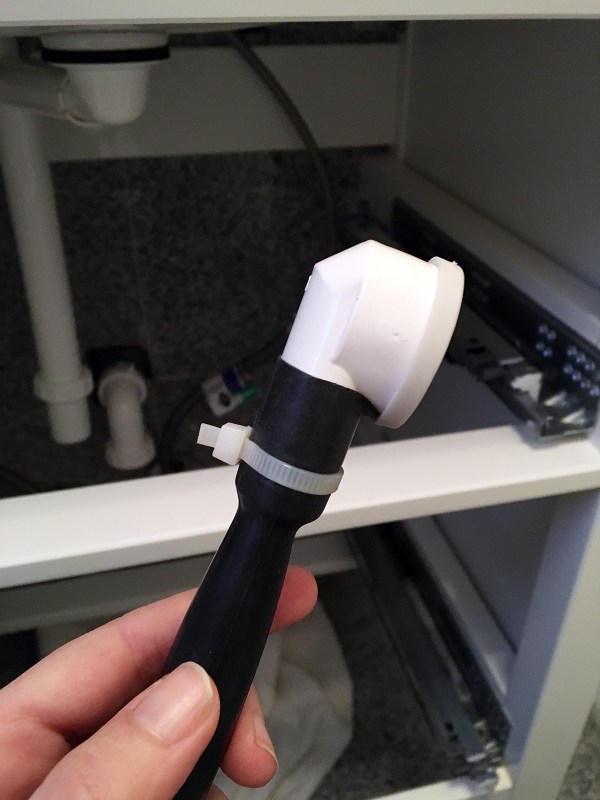
I don’t claim that this solution is perfect: if the sink were stopped up and water reached the overflow hole, the bike tube doesn’t drain water as quickly as a rigid tube would. But it’s totally water-tight and, ultimately, it’s the solution that saved me from having to hack the drawers and/or burn down the house. For our purposes, the overflow drain only gets used when water splashes back there. So, it’ll do.
Moving along! You have to punch out a hole on whichever side you install the overflow drain.
I waited to do the punch out step until the very end, when I was 100% certain what my final arrangement would be.
Good enough!
Checking your work and sealing it up
I waited a few days before installing the drawers so that I could keep an eye on the drain and supply lines, to make sure nothing was leaking. I also wiped a Kleenex over all of the components a couple times each day to make sure everything was staying completely dry.

Once I was certain the drain and faucet lines were watertight, it was time for silicon. I lifted the sink to put a line of silicon on top of the vanity and then carefully set it back in place. I also used silicon on the rubber seal that sits between the sink and the drain. I figured this might help make it extra-watertight; couldn’t hurt, anyway.

And, finally, I ran a line of silicon at the back of the sink, where it meets the wall.
This line of silicon was the most beautiful and satisfying thing I’ve ever done, because it meant this project was FINISHED.
The cat inspector gave me some shit about the bike tube plumbing but signed off on the job nevertheless.

Second-guessing your decision to buy an IKEA vanity
At a couple of points during this multi-day project, I’ll admit that I regretted buying an IKEA vanity. But, in the end, I think I made the right choice. The vanity offers more storage in a smaller footprint than the terrible saucer sink. The new sink has a smaller surrounding edge, but it’s actually functional because it’s level — the previous sink ledge sloped inward.
Before:
After: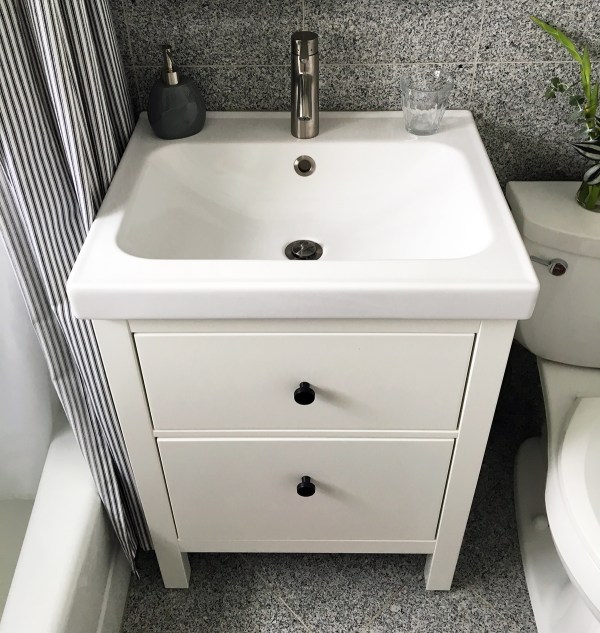
Before: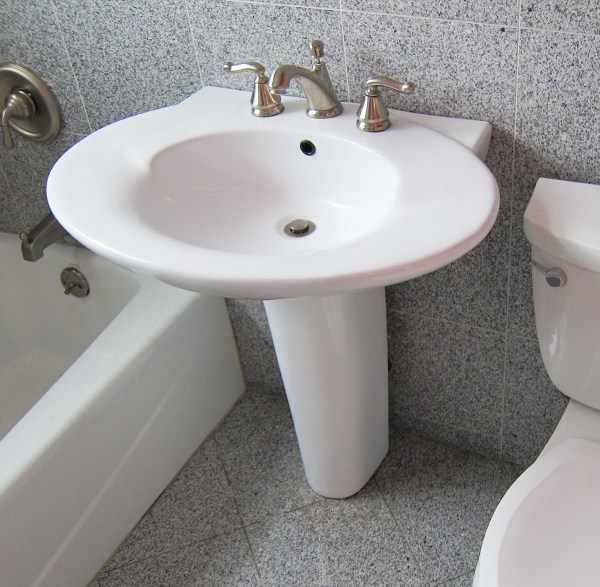
After: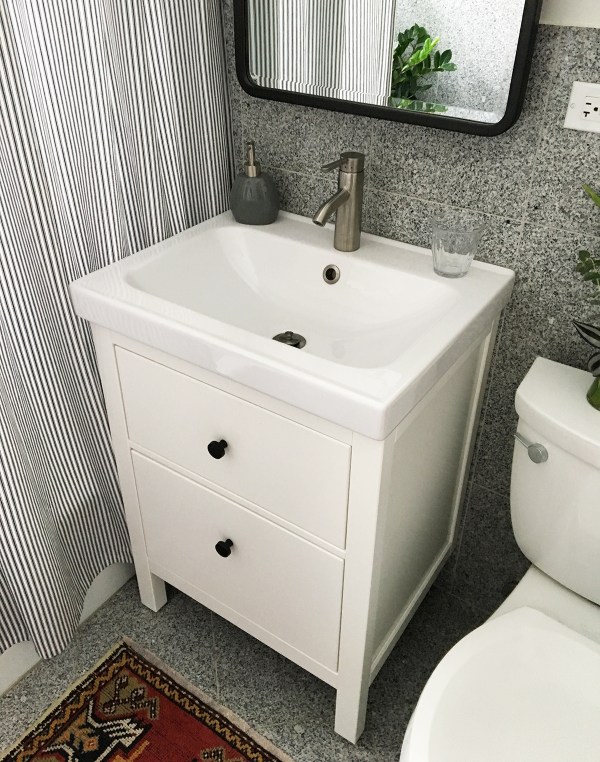
The vanity looks nice and feels very sturdy. I love the drawers: they slide smoothly and shut softly. I also love the faucet: the one-handle design is great, and the water turns on and off very cleanly. Most importantly, the vanity fit our tight space requirements and our budget.
You can see additional photos of the space in my Bathroom Makeover post.
Sources:
- HEMNES bathroom cabinet ($250 total for the vanity and sink)
- ODENSVIK sink
- DALSKAR faucet ($80)

I read that whole damn blog post though I’ll never do a project like this. Good job MP!
Same! Your confidence and handiness never cease to amaze me, Marti.
Thanks, you nerds!
Yay! Ikea is awesome but maddening. I’m planning on renovating both of our bathrooms with Ikea vanities – Hemnes in one, and Godmorgon in the other. This post was really helpful, and it makes me a little bit glad that my renovation is a while away. Might I request a post on how you organized the drawers? Is that too nerdy for words? Whatever, I’m an organization voyeur.
Thank you for asking that question so I have an excuse to do a post on how I organized the drawers! It will justify how much mental energy I expended on it.
I haven’t purchased a bathroom vanity from Ikea, but I may one day… this was a very good how-to guide, and even though I had no need, I read it all because I was continuously curious as to how you got all the parts to work out the way you needed them to lol. Great job on the self-install, and using the bike inter tube as the overflow. Only a woman could have come up with a fix like that lol (I’m a woman too, btw, so don’t be offended by that statement).
Having just (re)plumbed my IKEA kitchen sink with redesigned IKEA sink parts, I feel you — though I personally find plumbing more accessible than electrical. The inner tube was a crafty stroke of genius. In the future, however, I would recommend plumber’s putty over silicone for additional sealing power!
Totally! I didn’t have any plumber’s putty and would have cried if I had to go to the hardware store again for this project, but if it ever starts leaking I’ll try that.
WOW! This post is awesome! I read every word and wasn’t bored a bit. It gives me the courage to try it myself. Thanks.
Thanks so much, Brenda! I hope you do try it yourself – good luck!
Thank God for this post! You’re a life saver! I needed a real world description of what to expect and yours saved the day. And it was anything but boring. LOL! Then again, I’m a pretty big DIY nerd so… :) Thanks so much again!
Kristin
Woohoo! I’m so happy you found it helpful.
Anyone know where I can purchase the gasket that goes b/t the sink and the drain? The Ikea return and exchange section gave me only 1. I would like to have a few handy incase I find myself repairing the leaky sink 5 years from now 😕
Maybe eBay? I could see how having spare parts would come in handy.
Great post. I will be doing IKEA plumbing soon. Do you have a measure of the gap between the wall and the end of drawer? How much space do I have for plumbing? Thanks for your help!
Great question! The vanity is 18.5 deep, and the drawers are 14.5 deep. So, you have 4 inches of space between the wall and the back of each drawer.
I’m so glad I read this! I was just shopping for vanities and looked at the IKEA options and thought, “where does the plumbing go?”.
Thank you so much for this post! I have the same exact problem and am wondering where you got the pvc trap adapter.
I’m glad the post was helpful! I found the trap adapter at a local hardware store (which has now closed) but I linked above to the same one on Amazon: https://www.amazon.com/LDR-506-6325-Schedule-Adapter/dp/B000I19AA2 It’s the LDR 506 6325 PVC Adapter. Good luck with your installation!
This is SO helpful!! We are trying to figure out if the Hemnes vanity will work in our bathroom and this saved a trip to IKEA! I think we can make it work… that profile showing drawer depth gives me hope!
Thanks, Suzannah – good luck!
I love your bathroom inspiration round-up post. I’m also debating the vintage furniture vs. new vanity option for our half-bath. Just started following your blog and look forward to future posts!
Great post! Do you happen to know how many inches on center (horizontally) the wall mounting bracket holes are?
I’m a 57 year young grandmother DIYer. I’ve had the longer Hemnes vanity and double sink in my home for over a year because I’ve been so hesitant to start this, for fear I couldn’t make it work. I so appreciate your sharing your issues and solutions! I’m going to tackle this! I just know my bathroom will look great!
Did you have problems with the drain pipe thread leaking? I’m working around the water supply pipes, which of course, are right where the pipe wants to go. If I flex around them, I get a slow leak at the connector leading into the drain trap. Can it be sealed with teflon tape?
I HATE THIS PROJECT IVE BEEN SLAVING THROUGH! Thank you so much for your instructions!
Thank you for your detailed information and pictures. This is saving my sanity on getting a project finally done. I look forward to the adapter arriving courtesy of Amazon Prime in a couple of days.
I am a hack carpenter, can I reconfigure the drawers to fit regular plumbing? Will the bathroom sink match up with Moen plumbing? Thanks for your help?
I thought this would be more difficult. Thanks for showing me that I won’t have to rip out any drywall in order to install some of these. Now I’m super excited. I may still rip out some drywall anyway, because I want to go from two sinks to one, but this is still very encouraging as it looks pretty easy to me. I remodeled my whole kitchen with IKEA cabinets last year, so I’m not afraid of their stuff. A huge money saver and they look beautiful.
Thanks for this. Teflon tape is the bomb. I put in the Runskar faucet with Rinnen sink. The supply lines are not 9/16 ” unless that 1/16 does not matter, as Marti said. You’ll need to be fairly eloquent in trying to get the store clerk to understand you want 3/8″ on each side of the flex line but male threads on one end. (Local non-chain plumbing store MUCH more useful than big box yahoos) The 1 1/2″ to 1 1/4″ reducer is key, and again Mr-I-was-a-plumber-for-13-years at Lowe’s had never heard of such a thing and his two compadres agreed, and I was screwed. Until I found the reducer in another box. I chose to put that in the vertical line to allow gravity to help me in the drainage flow, rather than in the horizontal line.
Just because I’ve done this stuff before and know that my hands are not as strong as a man’s (60 yr old woman) I asked a local plumber to come check my work. He said it was all fine and did not charge me. The worst part? Drilling into the tile in the wall.
I did the same, using the adapter to go from the 1 1/2″ IKEA drain to the 1 1/4″ standard bathroom drain line in the vertical portion. I bought a new p-trap in 1 1/4″ and it was only $4. I wish IKEA offered both sizes for their drains because 1 1/2″ drain line is only standard for kitchen sinks.
Thanks Marti, I’m a somewhat experienced handyman, but this non-standard arrangement with the drawers makes me nervous. Your detailed account gave me a clearer picture of the challenges and possibles solutions ahead of me. When I’m doing something I’ve never done, there is often painful trial and error, so thanks for blazing the trail for me and others! :)
Joe
P.S. One of my likely challenges is that my hot and cold water valves are near the level of the drain hole in my wall. I don’t know yet if that will interfere with my p trap being flush to the wall. Fingers crossed. :)
Thank you so much for this post. I am just starting my IKEA sink installation. This has prepared me for the worst! Thanks for the many good laughs I had while reading through too!
I hope your installation went well!
This was super informative and helping me to get over procrastinating on this project. You also maded me laugh out loud several times. Thanks!
Thanks, Stephanie!
Your blog post was the only reason I didnt burn down my house! Thanks for sharing your tips!
Haha, glad I could help save your house!
Super helpful. Thanks for posting this.
Taking the time to post your trial and errors of this difficult install deserves Major cudos! I did this project June 2017 and never even thought to check others posts. I ended up cutting out a small section of back section of each drawer to accommodate best plumbing scenario I could come up with. (Pics in next post as I’m at home and this is a rental) I used small pieces of balsa wood to make an additional 1/2” space for plumbing. Evrerything great until today!
8 mo later, my tenants moved out and all looks great until I ran the sink to rinse out a rag and heard dripping sounds when finished. I almost missed it. Then I opened the drawer and saw water pooling and running out from under drain attachment and all over the floor.
I texted previous tenant to see if she ever dealt with leaks and no, but she said she did a deep clean on sink. what could have caused the black gasket to separate from bottom of sink? Was it just not tight enough screw into white drain spout? Should I reinstall gasket using silicone or plumbers putty?
The overflow tube can be trimmed and the angle of the overflow shoe turned to make the connection. The right, left, and top overflow connections are all available to connect to the overflow tube or intake from a condensate drain or other indirect waste discharge such as from a furnace.
What is the trick to getting the bathroom vanity drawers in ? mine are crooked.
Could you be so kind so as to tell me the height of the legs from the floor to the bottom of the cabinet? I really want this unit but I have to make sure I can accommodate my 7″ cast iron heater vent :(
Thank you so much!
Anywhere from 6-1/4 to 6-3/4” (the front legs are height adjustable for leveling).
Looks like I will be installing one of these units this weekend (so I’ve been told, anyway) and after going over your post felt I had to comment and say that I really appreciate the time and effort you put in to getting this down so that it might assist others. Well done. Great job, well written and photographed and very funny to boot. I definitely find it helpful and even though all the stuff is still in the boxes I am freaking out a little less than I was an hour ago so thanks again.
Brilliant DIY post with raw truth and invigorating victories. Well done, all around. I hope the cat inspector is on shift when I call.
Also feeling dumbfounded that IKEA doesn’t include, at the very least, printed instructions for US spec modifications.
Could you tell me please what is a clearance required between the wall and back side of the drawer – my hot and cold shut off valves sticking out about 4.5″ – is that enough ?
Thank you
Greg: The distance between the wall and the backside of the drawer is 4 inches exactly. So, your valves would hit the drawer, assuming they’re positioned where the drawers are. If they’re closer to the floor — less than 9 inches — the drawer would be higher than your valves and you’d be fine. Or, if they’re positioned in the open space between the two drawers, you’d be fine.
If you’re handy and willing to take the risk, I do think it could be possible to hack the back of the drawer to accommodate the valves — e.g. by cutting a window in the wood.
Hope this helps!
I have a question I was hoping you could answer. Since the pipe right out of the drain angles toward the wall and is fairly short vertically out of the sink drain, how would a standard drain plug fit? I’m using matte black fixtures and this color faucet as well (not from Ikea). But I want to use the matte black drain plug as well though it doesn’t seem that a standard one would fit?
Hi, Chris: I’m sorry, I’m not certain that a standard drain would fit with this configuration. You may have to modify the drawers if you use a plumbing setup that isn’t as compact as IKEA’s is. Good luck!
The faucet water lines are not 9/16” as IKEA states; they are in fact 3/8”. When to my surprise they fit my 3/8” shutoff valve, like you I initially didn’t compute that since 3/8” equals 6/18” there is a 3/16” inch (or almost 1/4”) difference between them that is not inconsequential. Some genius at IKEA evidently realized it made sense to provide 3/8” lines to this country, but it’s literature and faucet packaging still state 9/16” lines.
Thanks so much for this blogpost. I’m considering an Ikea vanity with the Odensvik and it’s great to see some real world plumbing.
I do have some questions about the potential of clogs in the drain and p-trap with Ikea plumbing. I came across this youtube video showing how to clean the Odensvik drain :
have you ever had to do this yet on yours? would the silicone you used on the drain seal pose a problem for this (I don’t think it would since it the video. it seems to remain in place but I’m not sure if Ikea has been using the same design over the years).
My other concern is with the Ikea p-trap. It doesn’t have a clean out hole. I’m wondering if it would make since to replace it with an ABS version with a clean out hole just in case. I think it would be fairly easy to swap it in.
Hi, Rui: Sorry for the delayed reply. I did actually clean the drain for the first time this year, and it looks like I used the same approach as your video. When I removed the plastic plumbing, the drain seal stayed stuck to the underside of the sink with no problem. I haven’t had a need to clean the P-trap, but I think it would be pretty easy to do by disassembling. Good luck with your installation!
thanks for the response Marti. I should be installing the sink this week. In my case I think I’ll replace the ikea p-trap with an ABS version just in case I ever need to clean it out.
take care :)
Thanks for this. I managed to install an ikea sink and and 3 cabinets in a weekend. But I like you was really surprised by the lack of plumbing instructions. My overflow pipe that ikea provided is a strange oblong shape (I think it was like yours) and until I read this I had no idea how to connect it to the main drain. The tyre solution is a great idea and I will try that tomorrow. So thanks for the tip. But surely there must be a proper solution for this out there somewhere ???..
Thanks for your post. I’m curious how the cabinet has held up to years of use. We’re thinking about putting the Hemnes vanity in a small window-less bathroom with just a small exhaust fan.
It has held up REALLY well. It looks and functions just like it did when I installed it. Our bathroom has a very small venting window and a weak exhaust fan. I’ve been meaning to do a follow-up post to share an honest (and glowing) review – I definitely still recommend it!
Looks awesome!
I just bought a cute house that has this exact drain and vanity. But it looks like someone punched out BOTH sides of the overflow drain! Any advice on how to plug the side that is not being used? I imagine you have some close-up, first hand experience. Thanks!
Oh yikes! If you found a perfectly sized PVC cap maybe you could seal it off using PVC cement, but I’d probably try to get a replacement drain from IKEA. Good luck!
Looks amazing. Well done!!! Random question…where did you get that black framed mirror? 😁
Thanks! It’s the Linfield Pivoting Rounded Rectangle Mirror from Rejuvenation.
I just bought two of these vanities and I’m going to try to install them myself so I really appreciate this detailed description. I was on the edge of my seat! :D
Thanks, Dawn! I hope your installation endeavor went well!
I know this is a really old post so i’m not sure if anyone’s still reading here but I just installed my own godmorgon/odensvik and I feel your pain! Thankfully we were prepared for the ikea drain oddities but overall felt it was for a good cause because I was unable to find any other vanity that had this amount of uninterrupted storage. Say what you will about Ikea but they are excellent at maximizing usable space.
Two things that I have had a minor issue with are 1) the pop up drain stopper – despite pressing it down and filling up the sink, it still slowly leaks out water and doesn’t keep it plugged up. Have you had this issue too?
and 2) i have the 4 drawer (48″ wide) model and the drawers don’t perfectly align. I’ve tried adjusting them but sadly it seems that the drawers just aren’t square, so there’s nothing i can do.
I also wanted to say, we had a similar problem with a real tight/inflexible fit with that overflow drain too! I wish i had thought of the bike tube, that’s genius!
PS. i, like others, was very surprised to find that the faucet supply lines matched the size of mine, with no additional parts needed. i was prepared for them to not fit based on the measurements in ikea’s guide.
The PVC , 1-1/2″ x 1-1/4″ reducer was the biggest assist! Thank you for posting about it. Saved the day. My Home depot and Lowe’s didn’t have this. Ace hardware for the win. Solved hours worth of struggle and attempts (and spills) with that handy part. Funny enough the home depot guy steered me in same direction with the gaskets and a union which didn’t work at all. Ikea should ship the sink with this reducer!
Thank you!
Thank you! I’m finally at the snapping point and planning on redoing our downstairs half bath. Looking to buy the Hemnes vanity on Friday but had concerns about getting the drawers to go.
I just installed the same unit, but instead I ditched the Ikea trap and went with a 1-1/2 siphon adapter on the vertical Ikea pipe, to a 1-1/2 abs trap then bushed down to 1-1/4 into the wall. This prevented all slip joints from being submerged and potentially leaking
Hello!
I just stumbled across your website and am amazed at what you’ve accomplished!
I’m an avid Pinterest user and pinned your article to my bathroom/hacks board. I’ve only 14k followers so don’t expect a herd, lol.
Anywho, I’ve never brought this up to anyone before – and do feel free to ignore – but I’m surprised bloggers don’t check what their article looks like after being pinned. At least by a pinner using their phone. I’d guesstimate 95% of the pins are just a photo without any info included ON the photo. So when viewers scan pins, boards, etc , if they aren’t enticed by just the photo, they aren’t going to take the time to tap it open and read its title/description. I once started to add text onto copied pin photos and then manually copy the original text and web address back but it was too time consuming!
Who knows, by the time you read this, Pinterest will probably have changed the format/template again (without notice, explanation, or instruction) so this tip may no longer matter anyway. Shrug.
¯\_(ツ)_/¯
In planning stages of remodeling each of our bathrooms and had settled on the notion of leaning on Ikea for new vanities. Super thankful for this post because it definitely answered a few of my questions regarding install and the series we are likely gonna purchase (Hemnes for each bath).
Hey, Josh: Glad it was helpful! I still highly recommend this Hemnes vanity – we’ve had installed for 6 years now and it’s held up great.
Hi Marti – great post!! Great plumbing!! I found this, because I was wondering about the technicalities of the plumbing. But then I noticed how close your vanity is to the side of the bath, and though ‘Aha!’. I had rejected a larger vanity because it would be so close to the side of my bath (also to the left of the vanity and sitting 54cmc high). But maybe I should rethink. Does it look weird when you’re sitting in the bath? Or am I weird for even wondering about that? I may be overthinking. :) Appreciate your thoughts on this one.
Thank you for this post! I referenced it regularly while installing my own today. We got the 40″ Odensvik and Hemnes, but same deal.
Went like a dream, first try — many props to you for the tips.
Going in this weekend. I’ve already seen a couple things in your write-up that might otherwide vex me. Thanks, and wish me luck!